

A Pro's Guide to connecting an icemaker to water line in LA
Hooking up an ice maker to a water line might seem like a simple job for a Los Angeles restaurant. At its core, you're just tapping into a cold water supply, running a 1/4-inch line over to the machine, and using compression fittings to lock it all down. But doing it right is what separates a reliable ice supply for your Koreatown eatery from a weekend-ruining water disaster.
Why a Solid Ice Maker Connection Is Non-Negotiable
For any restaurant in Los Angeles, a flawless ice maker connection is the backbone of the whole operation. It’s a small detail that makes a huge difference, impacting everything from the quality of drinks at a Downtown LA bar to the food safety inside a Silver Lake food truck's commercial refrigerator. A sloppy installation isn't just a minor headache; it's a real threat to your business.
The Real Cost of a Bad Connection
A single loose fitting or a kinked water line can spiral into a catastrophe. Picture a slow, hidden leak behind your commercial freezer going unnoticed all weekend. You could walk in Monday morning to find ruined flooring, damaged subflooring, or even structural issues in your mobile kitchen.
It's not just about property damage, either. A poor connection puts a ton of stress on your expensive restaurant equipment. If the water flow isn't consistent, the ice maker's internal parts get strained, leading to early breakdowns and emergency repair bills. That means downtime, lost sales, and customers asking why their Thai iced tea is lukewarm during a heatwave.
Ensuring Compliance and Quality
Let's not forget about Los Angeles County health codes. An improper connection can create backflow risks, which can contaminate your potable water supply. That's an instant health code violation and some serious fines. A secure, professional installation is your guarantee for:
- Consistent Ice Production: No more frantic ice runs during a dinner rush because the machine couldn't keep up at your busy Japanese restaurant.
- Equipment Longevity: You're protecting a major investment in high-quality commercial ice machines and freezers.
- Safety and Compliance: You'll meet all local health and safety standards from the get-go.
The demand for reliable setups speaks for itself. The global market for ice maker water line kits hit a staggering USD 1.42 billion in 2024, proving just how much the foodservice industry invests in getting this infrastructure right. For an LA restaurant owner, it’s a clear sign: get the connection right the first time, every time. You can learn more about the growing market for these essential components to see just how critical this piece of equipment is.
Gathering Your Gear for a Leak-Proof Job
Having the right tools ready before you start is the difference between a quick, professional job and a frustrating afternoon running back and forth to the hardware store. For any busy Los Angeles restaurant, time is money, and a botched installation means costly downtime.
Think of it like setting up your mise en place before a dinner rush—being prepared is everything. This isn’t just a simple list; we'll get into the "why" behind each item so you know its exact role in creating a solid, leak-free connection that lasts.
Essential Toolkit for Ice Maker Water Line Installation
Before you even think about turning off the main valve, get your toolkit lined up. Missing even one small piece can bring the whole project to a grinding halt. We've put together a checklist of the must-haves for a smooth, no-surprises installation.
| Item | Type/Size | Pro Tip for LA Restaurants |
|---|---|---|
| Adjustable Wrenches | 2 wrenches, 8-10 inches | Use one to hold the fitting steady and the other to tighten. This is key to avoiding stripped threads. |
| Tubing Cutter | Small, for ¼" or ⅜" tubing | A clean, square cut is essential for a watertight seal. Avoid hacksaws at all costs. |
| Drill | Cordless drill with a 3/8-inch bit | You'll likely need to route the line through a cabinet. A sharp bit prevents chafing the tubing. |
| Tubing | 1/4-inch PEX or Copper | PEX is flexible and great for tight spaces in a food truck. Copper is durable but tougher to bend. |
| Fittings | Compression fittings for 1/4-inch tubing | These little brass pieces are the heart of your connection. Make sure they're high quality. |
| Shutoff Valve | Saddle Valve or Tee Fitting | Non-negotiable for future maintenance. A simple tee fitting is often the most reliable choice. |
This toolkit covers the essentials for a standard commercial ice machine hookup. Having these specific items on hand ensures you can tackle the job efficiently without any last-minute headaches.
Get the Right Gear the First Time
The tools you use are only half the story; the materials you choose are just as critical. For any LA restaurant serious about its operations—from a Thai spot in Hollywood to a Mexican kitchen in East LA—the small details matter.
- Tubing: The industry standard is ¼-inch diameter tubing. It's the go-to for ensuring proper water flow and compatibility with major commercial brands. PEX (cross-linked polyethylene) is often the easiest to work with because of its flexibility, but if you’re running the line near hot equipment, durable copper is a safer bet.
- Fittings: High-quality brass compression fittings are the heart of the connection. They create the seal between your new tubing and the valves, so don't skimp here.
- Shutoff Valve: You absolutely must install a dedicated shutoff valve near the ice maker. This is a lifesaver for future maintenance or repairs, letting you service the machine without shutting off water to your whole kitchen.
A common mistake we see in LA food trucks and busy kitchens is using a dull blade or the wrong tool to cut the tubing. A jagged, angled cut is the number one cause of those slow, persistent leaks that create water damage behind your commercial refrigerators and freezers.
This ¼-inch specification is especially vital for connecting equipment from dominant foodservice manufacturers like Atosa. If you're curious, you can review guides on how major brands approach water line installation to see how the fundamentals apply across the board.
Making the Connection: A Step-by-Step Guide
Alright, you’ve got your tools and materials laid out. Now it's time to get your hands dirty and make the actual connections. This is where the real work begins, and getting it right the first time is what separates a smooth-running kitchen from a future plumbing nightmare.
Whether you're running a busy downtown L.A. restaurant or a tight-squeeze food truck, even a tiny leak can throw a wrench in your whole day. We're going to walk through this deliberately, focusing on the little details that ensure your setup is solid and leak-free from the get-go.
Finding and Prepping Your Water Source
First things first, you need to find a good spot to tap into your plumbing. The best bet is almost always a cold water line, which you can usually find under a nearby sink or tucked away in a utility closet. If you're in a Los Angeles food truck, this will likely be the main line that feeds your three-compartment sink. The most important thing is picking a spot you can easily get to later if you need to do any maintenance.
Once you’ve zeroed in on your water source:
- Turn Off the Water: This is non-negotiable. Find the main shutoff for that specific line and turn it off before you even think about making a cut.
- Drain the Line: Open up a faucet somewhere downstream from where you’re working. This will relieve the pressure and get rid of any water still sitting in the pipe. Trust me, it beats getting an unexpected shower.
- Clean the Pipe: Take a moment to wipe down the section of pipe where you plan to install your new valve. A clean, dry surface is key to getting a perfect seal.
These quick prep steps are your best insurance against a messy, frustrating installation.
Connecting an ice maker really comes down to a simple, three-part process.
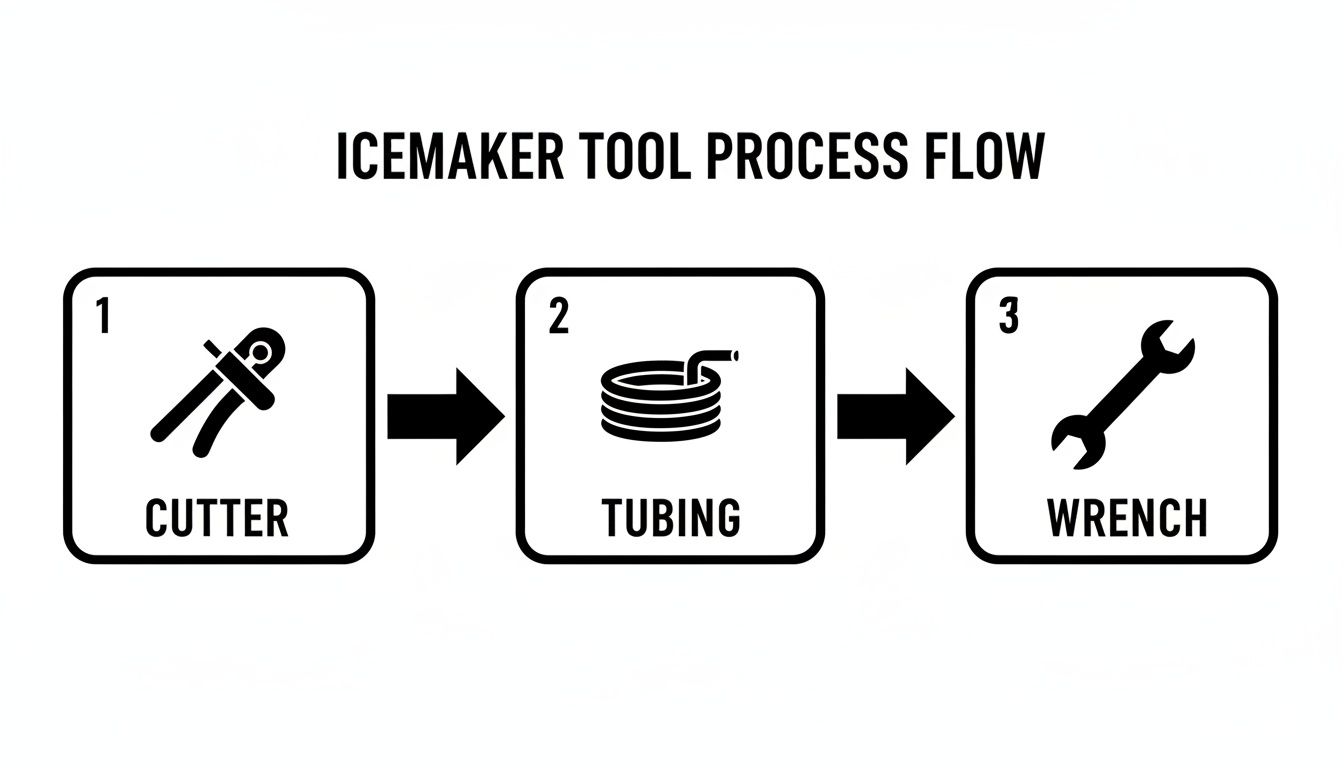
It’s all about a clean cut, a smart route for your tubing, and a secure final connection. Nail these three things, and you’re golden.
Getting the Shutoff Valve and Water Line in Place
You absolutely need to install a dedicated shutoff valve just for the ice maker. It’ll let you service the machine down the road without shutting off water to the rest of your kitchen. While a tee fitting is generally the more reliable option, a saddle valve will also do the job if it's installed correctly.
With your valve installed, it’s time to run the new water line. In a chaotic commercial kitchen, you have to protect this line. Run the tubing along baseboards, tuck it behind other equipment like commercial refrigerators, or route it through cabinets—anywhere it’s out of the way of foot traffic. Be careful not to create any sharp bends or kinks; these can choke the water flow and weaken the tubing over time. A few clamps every couple of feet will keep the line secure and prevent it from getting snagged or vibrating loose.
Here’s a classic mistake I see all the time: overtightening the compression fittings. It feels like you should crank down on the nut as hard as you can to stop leaks, but that can actually crush the brass ferrule or damage the tubing, creating a weak spot. The right way to do it is to tighten it by hand until it's snug, then give it just one more quarter-turn with a wrench. That's it.
The Final Connections and System Flush
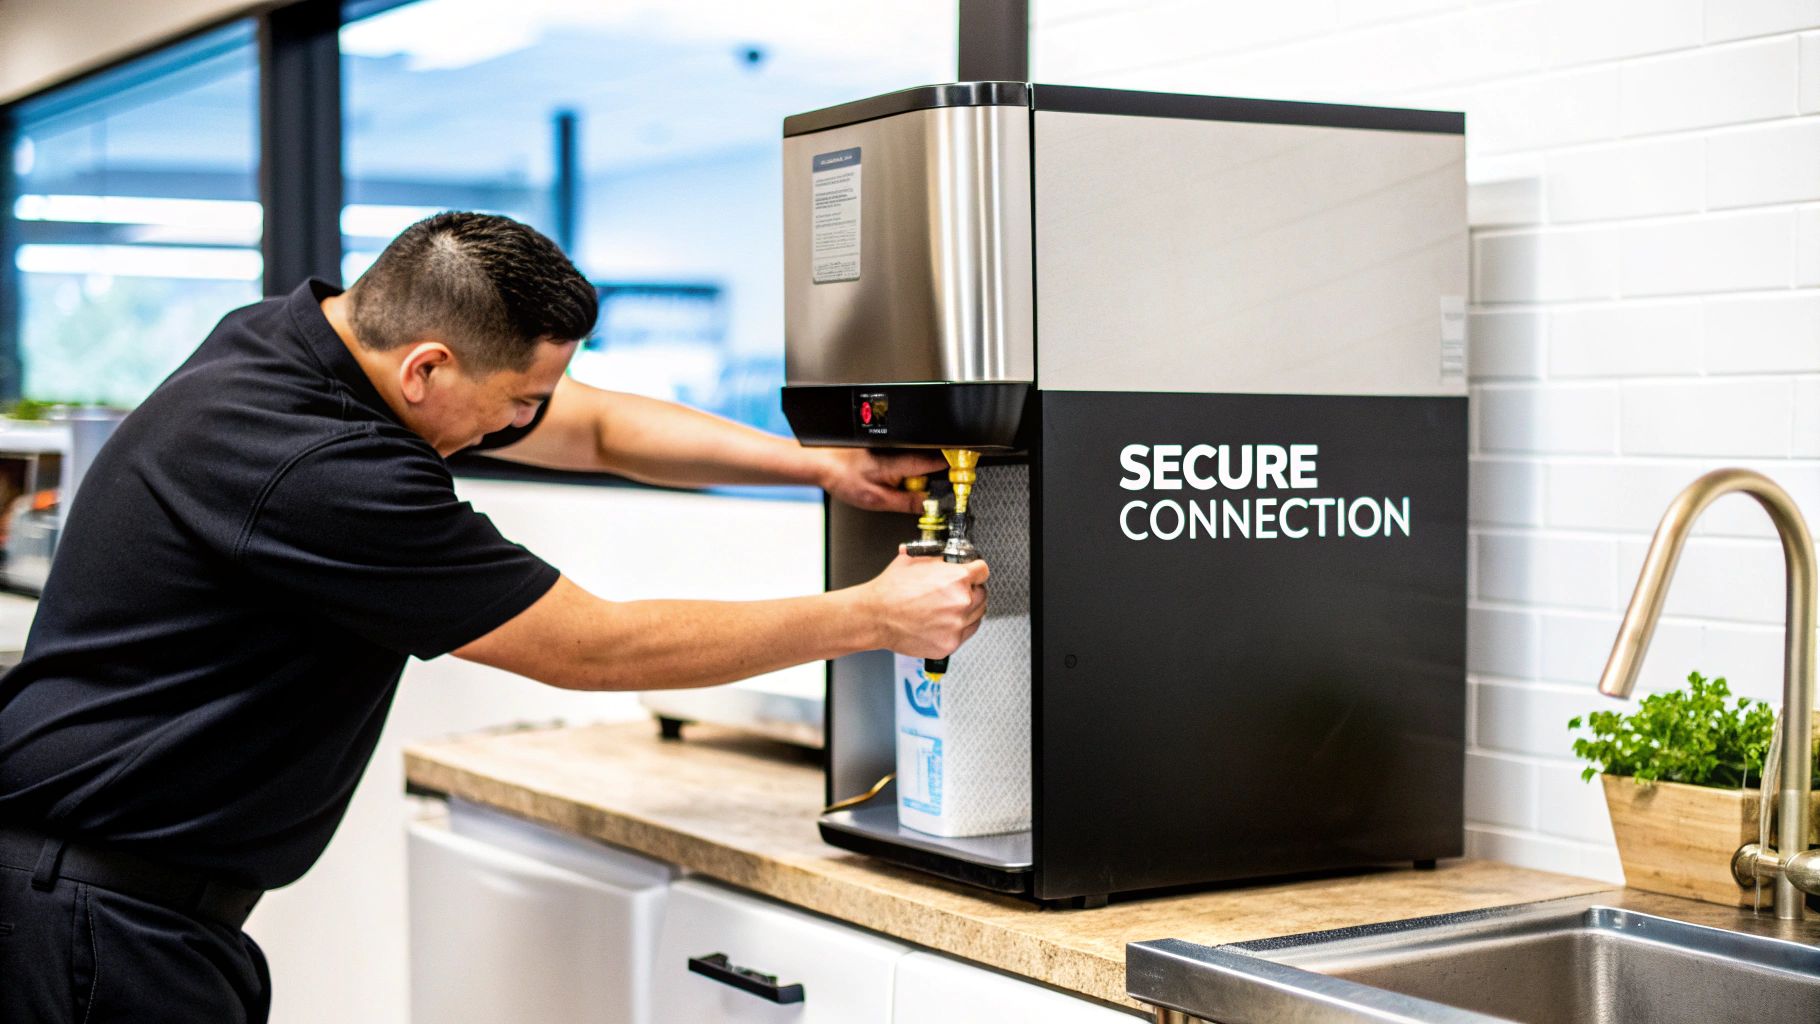
We're in the home stretch. The last step is connecting the line to the ice maker itself. On the back of most commercial machines, you’ll find a water inlet valve with a threaded connection, which is where your compression fitting will go.
Before you power on the ice maker, you have to flush the system. Take the end of the new tubing and stick it in a bucket. Then, slowly open your new shutoff valve. Let the water run for a couple of minutes to wash out any dust or debris from inside the new line. This simple step makes sure the first ice you serve in your restaurant is perfectly clean.
Once it's flushed, connect the line securely to the ice maker’s inlet valve. Slowly turn the water back on and carefully check every single connection point for drips. This attention to detail is what makes for a professional job that won't turn into an emergency call later.
And if you're looking to upgrade your setup or add a new machine, check out our selection of commercial ice makers built to handle the pace of LA's best foodservice businesses.
Optimizing Water Quality and Pressure
Getting the water line hooked up is a great start, but it’s just that—a start. For your ice machine to pump out crystal-clear ice day after day and give you years of service, you have to get a handle on the water going into it. This is a huge deal for any restaurant in Los Angeles, where our notoriously hard water is the sworn enemy of all foodservice equipment.
Hard water is loaded with minerals like calcium and magnesium. They leave behind a chalky gunk we call scale. Over time, that scale clogs up tiny solenoids, puts a crust on your evaporator plates, and makes your machine’s compressor work way too hard. The result? Cloudy, shrunken ice, slow production, and eventually, a breakdown that’ll cost you. Protecting your investment starts with good filtration.
Choosing the Right Filtration System
Not all water filters are the same. What works for a high-volume Korean BBQ spot in K-Town might be overkill for a food truck serving Chinese food. Knowing the basic filter types is the key to making a smart call when you’re connecting an icemaker to the water line.
- Sediment Filters: Think of these as your bouncers. They catch the big stuff—rust, sand, and dirt that can flake off from older city pipes.
- Carbon Filters: These are all about taste and smell. Carbon is what strips out the chlorine and other chemicals that make your ice taste like straight-up tap water.
- Scale-Inhibiting Filters: For anyone in Los Angeles, this is the most important one. These systems use special polyphosphates that keep minerals suspended in the water so they can’t stick to the inside of your machine and build up that destructive scale.
For most operations here in LA, a multi-stage system that combines all three is the way to go. It’s the best way to get clean, great-tasting ice while actively defending your machine from the inside. And remember, filtration doesn't replace regular cleaning. If you need a refresher, our guide on how to clean a Manitowoc ice maker has all the steps laid out.
Taming Water Pressure Fluctuations
Water pressure is the other half of this puzzle. Commercial ice makers are built to work in a specific pressure window, usually somewhere between 20 and 80 PSI (pounds per square inch). Anything outside of that sweet spot is asking for trouble.
If the pressure is too low, the machine is starved for water, and you'll get thin ice sheets or the machine will fail its harvest cycle. But high pressure is way more dangerous. Sudden spikes, which happen all the time in big commercial buildings, can blow out solenoids, crack the internal tubing, and cause a major leak behind your commercial refrigerators and freezers.
A simple pressure gauge from any hardware store is a non-negotiable tool for this job. Test the pressure right at the source before you even hook up the line. If it’s consistently reading over 80 PSI, you absolutely need to install a water pressure regulator. It's not a suggestion—it's essential insurance.
A pressure regulator acts like a gatekeeper. It makes sure that no matter how high the city’s pressure surges, your ice maker gets a steady, safe supply. It's a small, one-time investment that can easily save you from thousands in equipment damage and a water-logged kitchen.
Final Checks and Troubleshooting Common Problems
The water line is hooked up and the machine is sitting pretty, but don't walk away just yet. These last few checks are what separate a rock-solid installation from one that’s going to give you a massive headache during a weekend dinner rush.
Rushing this part is how you end up with slow, hidden leaks behind your commercial refrigerators or freezers. That kind of water damage can go unnoticed for days. Taking an extra five minutes now to double-check every connection is the best insurance against an emergency plumbing call later. Be patient and be thorough.
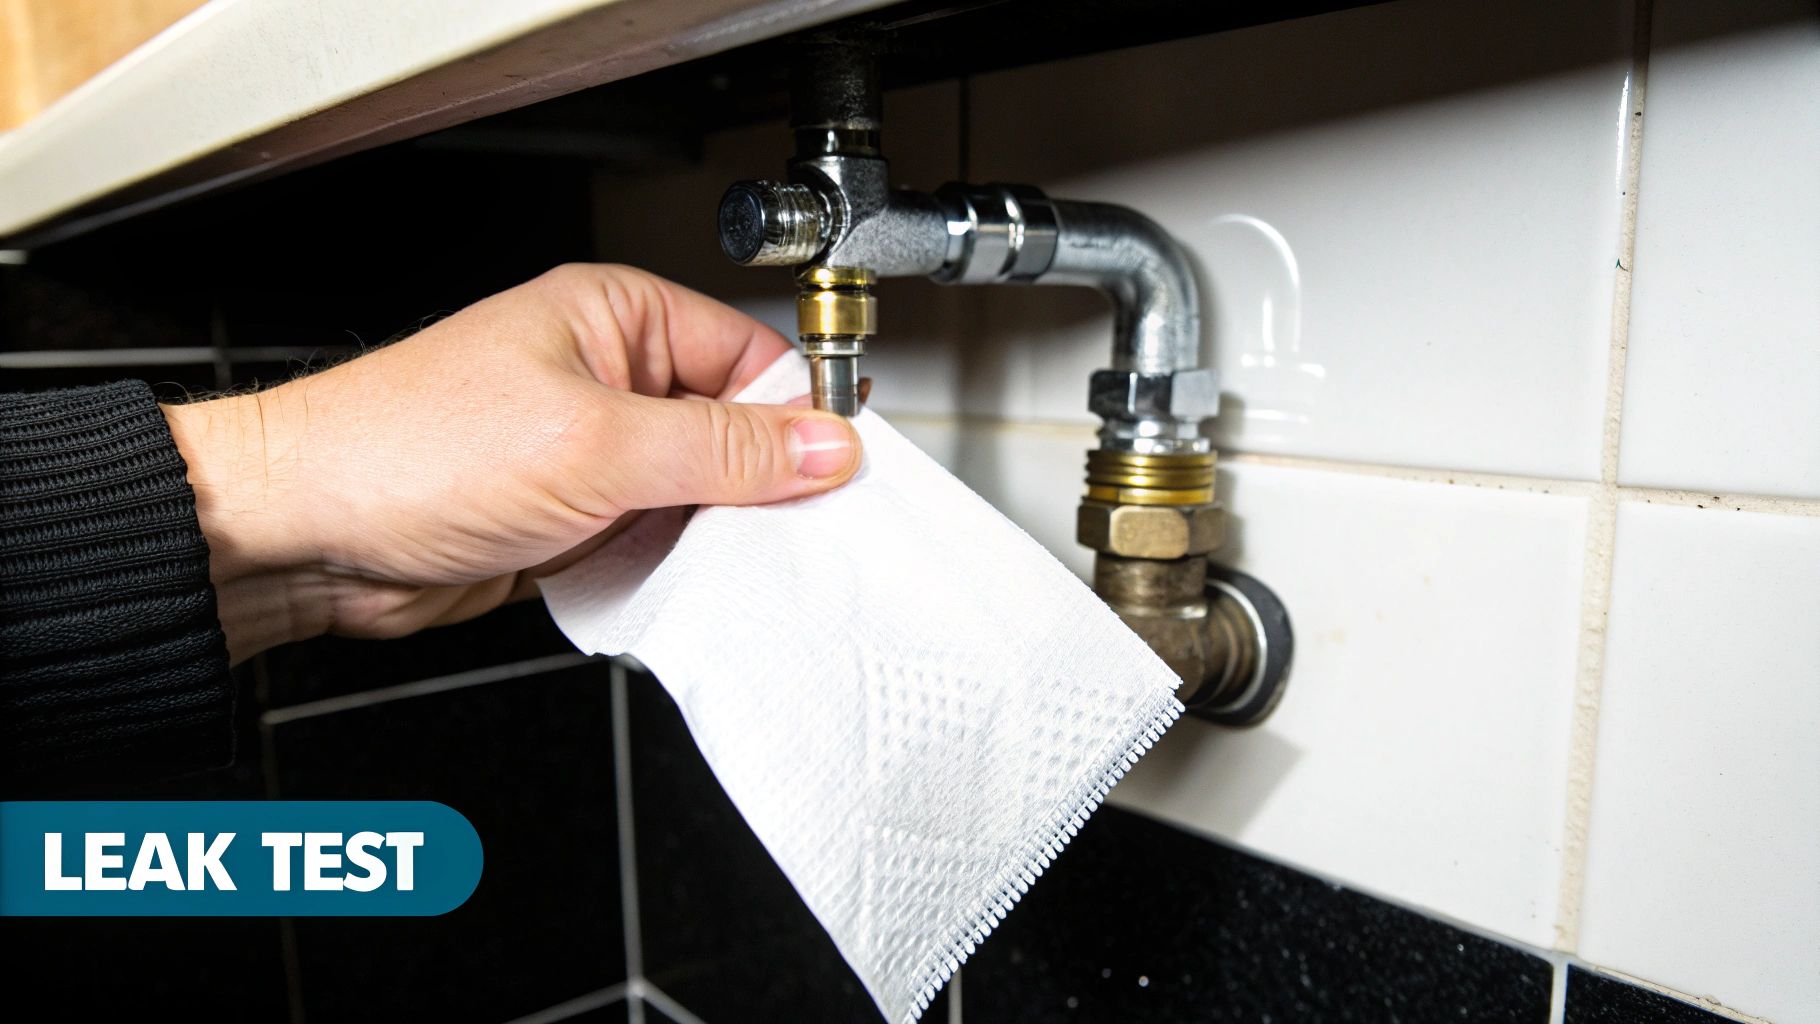
The Leak Test a Pro Never Skips
The most crucial thing you can do right now is a thorough leak test. Even a single, tiny drip can waste hundreds of gallons of water and slowly wreck your equipment or kitchen floor. The process is simple, but it demands your full attention.
Slowly crack open the shutoff valve you installed and let the water line pressurize. Don't just give the connections a quick glance—get in there and inspect each one. Grab a dry paper towel and press it firmly against the bottom of every fitting, from the saddle valve all the way to where the line meets the ice maker. That paper towel will show you even the slightest bit of moisture that your eyes might miss.
A rookie mistake is only checking for leaks the second the water is on. Let that line sit under full pressure for at least 10-15 minutes. Some sneaky leaks only show up once a fitting has had time to settle under pressure.
If you spot a drip, don't just try to crank the fitting down harder. Turn the water off, bleed the pressure, and take the connection apart to reseat it. More often than not, a tiny piece of debris or a slightly crooked ferrule is the real problem. Fixing it the right way now saves you a much bigger headache down the road.
Solving Common Ice Maker Issues
Even with a perfect installation, you might hit a few common snags. Knowing how to diagnose them can save you a service call, which is crucial when you need ice for your busy Japanese ramen bar or Thai food pop-up.
Here are a few frequent problems you might see right after connecting your ice maker:
- No Water Flow: Is the machine running but the tray is bone dry? You’ve likely got a blockage. First, make sure the shutoff valve is fully open and there are no kinks in the line. Sometimes a new water filter gets air-locked; try taking it out and putting it back in.
- Slow Ice Production: This is almost always a pressure or temperature problem. Get your gauge out and confirm the water pressure is above 20 PSI. Also, take a look around—is the machine shoved right next to a hot griddle? High ambient heat forces the compressor to work overtime.
- Off-Tasting Ice: Did you remember to flush the line before making the final connection? If not, residue from the new tubing can make the first few batches taste funky. Just let the machine run a few full cycles and toss the ice until it tastes clean and fresh.
For a deeper dive into more complex problems, our guide to commercial ice maker troubleshooting can help you diagnose issues like a pro. Think of these final checks as your first line of defense for a dependable, long-lasting ice supply.
Your Top Ice Maker Installation Questions, Answered
Even when you've got a plan, a few questions always come up in the middle of a project. For busy restaurant and food truck operators here in Los Angeles, getting fast, straight answers is key to keeping things on track without losing a service day.
We get calls all the time about these installs, so we’ve put together a few of the most common questions we hear from chefs and owners in the LA foodservice scene.
What's the Best Water Line to Use?
For nearly every commercial kitchen we see in LA, 1/4-inch PEX (cross-linked polyethylene) tubing is the hands-down winner. It's flexible, which is a lifesaver when you're trying to snake it behind bulky commercial refrigerators and freezers. Whether you’re in a crowded Thai kitchen or a tight food truck, PEX makes the job much easier.
Sure, copper is tougher and holds up better to high heat, but PEX is just simpler to work with and far less likely to kink. It also fights off scale buildup from LA’s notoriously hard water, which is a massive plus for the long-term health of your ice machine.
How Much Should I Budget for a Pro Installation?
Getting a professional plumber involved is always a smart play, especially if your setup isn't straightforward. On average, you can expect to pay around USD 100 to have a water line installed for your refrigerator and ice maker, with most jobs falling somewhere between USD 75 and USD 130.
Of course, that price depends on the materials and how much work is involved. For restaurant operators in Los Angeles juggling budgets for multiple pieces of restaurant equipment, knowing these numbers is crucial for planning. You can get more details on what goes into these installation costs on Angi.com.
If you have a water source right next to the ice maker, it's a pretty simple job. But if your plumber has to run that line through a few walls or clear across a big kitchen, you can expect the labor costs to climb.
Can I Just Use One of Those Self-Piercing Saddle Valves?
We see saddle valves in a lot of DIY kits, but honestly, you should avoid them in a commercial kitchen. These valves work by literally piercing the water pipe, which creates a weak spot that’s famous for starting slow, disastrous leaks over time.
The right way to do it—the way that meets code and won’t give you headaches—is to install a proper tee fitting with its own quarter-turn shutoff valve. This creates a secure, full-flow connection that can handle the constant demand of a busy Mexican or Japanese restaurant. It takes a little more effort up front, but it will save you from a major water damage nightmare down the road.
At Los Angeles Restaurant Equipment, we're all about providing the tough, high-performance commercial ice makers and kitchen gear that LA’s best foodservice spots depend on. From heavy-duty Atosa refrigerators to full cooking lines, we have what you need to build a kitchen that can keep up with you. Check out our full catalog and gear up your operation at https://losangelesrestaurantequipment.com.