

How to Clean a Manitowoc Ice Maker a Los Angeles Restaurant Guide
The key to cleaning a Manitowoc ice maker is to follow the process down to the letter: turn off the machine, mix an approved descaling solution, run the clean cycle, manually scrub all the components, and then do it all over again with a sanitizing solution. Getting this right is about more than just maintenance—it’s about protecting your restaurant equipment and your customers.
Why Cleaning Your Ice Machine Is Critical for LA Restaurants
Picture this: it’s the middle of the dinner rush at your Thai Town restaurant, and the ice machine just gives up. For any restaurant in Los Angeles, from a bustling downtown food truck to a popular Koreatown eatery, a dead ice machine is a full-blown crisis. It's not just a minor hiccup; it’s a direct hit to your sales and your hard-earned reputation in a city that demands perfection.

Keeping that machine clean isn't just another chore on the checklist. In L.A.'s cutthroat food scene, it's a core business strategy. Consistent cleaning is your best defense against the unique operational headaches we all face here in Southern California, impacting all your restaurant equipment, from commercial refrigerators to freezers.
The Impact of Neglect in a Los Angeles Kitchen
Letting the ice machine go has real, tangible consequences that spiral far beyond a simple breakdown. In a high-volume spot, whether it's a food truck on Abbot Kinney serving Mexican food or a Japanese restaurant in Beverly Hills, these problems can escalate in a hurry.
A huge part of the problem is Southern California's notoriously hard water. It's loaded with minerals like calcium and magnesium that slowly build up inside your machine. This gunk, known as limescale, basically acts like a layer of insulation on the parts that need to stay cold.
- Skyrocketing Energy Bills: That scale buildup forces the refrigeration system to work way harder to make ice, which means your DWP bill is going to climb.
- Expensive Breakdowns: All that extra strain causes expensive parts like the compressor or evaporator to fail way sooner than they should. A simple cleaning task can quickly turn into a repair bill that costs thousands.
- Bad Ice, Unhappy Customers: Often, the first red flag is the ice itself. Scale buildup leads to cloudy, soft, or weirdly shaped cubes that melt in a flash and can even give drinks an off-taste.
Protecting Your Patrons and Your Reputation
Beyond the mechanics, a dirty ice machine is a serious health hazard. The dark, damp inside of an ice maker is the perfect breeding ground for slime, mold, and bacteria you can't even see. In a busy kitchen serving Chinese or Thai food, everyday particles like flour, yeast, or even aerosolized grease can get inside and make things grow even faster.
A contaminated ice machine isn't just a maintenance problem; it's a direct violation of health codes that can lead to fines, a forced closure, and permanent damage to your restaurant's name.
This is where the real risk is. Serving ice contaminated with bacteria can lead to foodborne illnesses and put your customers in harm's way. It goes beyond what you can see; understanding effective foodborne illness prevention strategies is non-negotiable for protecting the people you serve.
A failed health inspection over a dirty ice machine is a public mark against you that can scare away customers for good. In the end, knowing how to clean a Manitowoc ice maker isn't just about taking care of your equipment—it's about honoring the trust you've built with every single person who walks through your door.
Assembling Your Toolkit for a Safe and Effective Clean
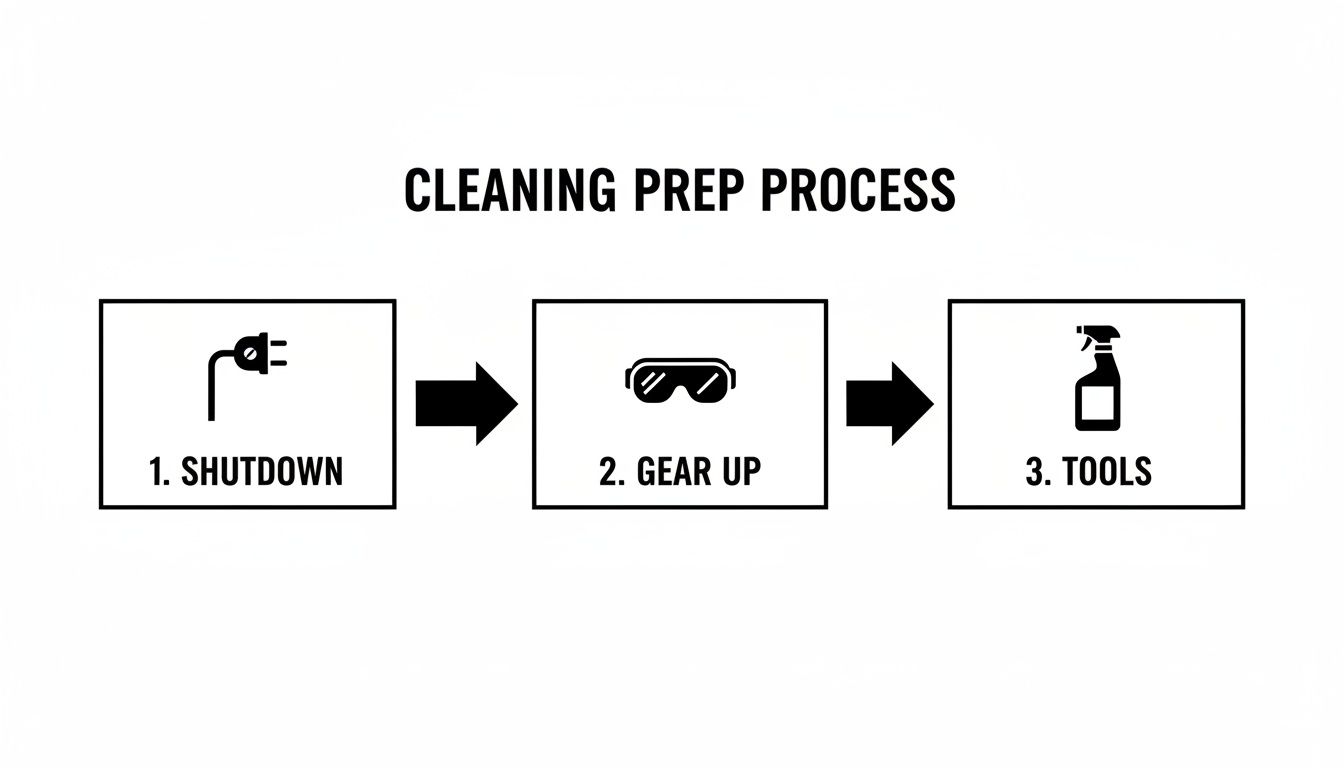
Before you even touch the cleaning cycle button on your Manitowoc ice maker, taking a few minutes to prepare is a must. This isn't just about grabbing supplies; it’s about setting up a safe workspace, especially in a hectic Los Angeles kitchen, and protecting your investment from damage. Getting this right from the start makes the whole job go smoothly.
Safety always comes first. In a busy food truck or a packed restaurant, it's easy to get ahead of yourself. Correctly shutting down the machine is the single most important part of this whole process.
First, head to the circuit breaker that powers your ice machine and flip it to the OFF position. This cuts all electricity, eliminating any shock risk. Next, find the water supply line feeding the unit and turn the valve completely off. This simple two-step shutdown prevents both electrical mishaps and surprise puddles on your kitchen floor.
Choosing the Right Chemicals Is Crucial
This is where so many well-meaning kitchen managers make a very expensive mistake. You absolutely cannot use just any cleaner on a Manitowoc machine. Things like vinegar or bleach might seem like a good idea, but they will cause permanent damage to the sensitive parts inside.
The nickel-plated evaporator is especially at risk. The strong acid in vinegar will eat away at this plating, making your machine less efficient and eventually leading to a repair bill that can easily hit four figures. Bleach is just as bad—it degrades plastic and rubber components and can leave behind chemical residues that contaminate your ice.
To do the job right, you have to use the manufacturer-approved chemicals:
- Manitowoc Ice Machine Cleaner (Descaler): This is a food-grade, nickel-safe acid solution made specifically to break down the tough limescale that Southern California's hard water leaves behind. It does the job without eating away at the machine's guts.
- Manitowoc Ice Machine Sanitizer: After the descaler clears out the mineral buildup, this solution gets rid of any bacteria, slime, or mold that was hiding in the food-contact zones.
Never, ever mix the descaler and sanitizer. They are used in two separate steps for a reason: the descaler gets rid of the mineral shield, and the sanitizer kills the biological gunk underneath. Using them together or in the wrong order makes them useless and can even be hazardous.
Approved Cleaners vs Unsafe Alternatives
Choosing the right cleaner isn't a suggestion; it's a requirement to protect your machine. Using the wrong product can lead to costly repairs and void your warranty. Here’s a quick breakdown of what to use and what to avoid.
| Solution Type | Approved Example | Unsafe Alternative | Impact on Machine |
|---|---|---|---|
| Descaler | Manitowoc Nickel-Safe Cleaner | Vinegar | Corrodes nickel plating on the evaporator, leading to inefficiency and costly replacement. |
| Sanitizer | Manitowoc Sanitizer | Bleach / Chlorine | Degrades plastic tubing, gaskets, and seals. Can leave harmful residue in the ice. |
| General Cleaner | Mild Soap & Water | Abrasive Powders | Scratches surfaces, creating areas for bacteria to grow. |
Sticking to Manitowoc's approved formulas is the only way to guarantee you're not slowly destroying your ice maker from the inside out.
Gearing Up with Personal Protective Equipment
You're working with commercial-grade chemicals, so you need the right protective gear. While these solutions are safe for your machine when used correctly, they can irritate your skin and eyes. Before anyone opens a bottle, make sure they have the right PPE.
- Chemical-Resistant Gloves: A must-have for protecting your hands from direct contact with the descaler and sanitizer.
- Safety Glasses or Goggles: These will shield your eyes from any accidental splashes, which can easily happen when you're scrubbing parts or pouring liquids.
Once the power is off and your team is geared up, you can gather your other tools. A few soft-bristle brushes, some clean cloths, and a bucket for mixing are all you really need. Keeping everything organized means no scrambling for supplies mid-clean. And while you're focused on the inside, don't forget the outside is just as important for that clean, professional look. For tips on keeping the exterior spotless, check out our guide on finding the best stainless steel cleaner for your kitchen equipment.
A Practical Walkthrough of the Deep Cleaning Process
Alright, with your machine powered down and your gear on, it’s time to get your hands dirty. This isn't just about pushing a button; a proper deep clean involves the machine's own cycle plus some good old-fashioned manual work. Getting this sequence right is the key to knocking out scale and slime for good.
This whole process really boils down to a few critical prep steps: shutting it down safely, gearing up, and getting your tools in one place. Don't skip this foundation.
Think of this as your pre-flight check. Safety and preparation are non-negotiable before a single drop of cleaner touches that machine.
Initiating the Automated Descaling Cycle
First up, we're tackling the invisible enemy: mineral buildup. If you're in Southern California, you know all about hard water. That limescale coats the inside of your machine, slowly strangling its performance. The automated 'Clean' cycle is your first line of attack.
Start by getting all the ice out of the bin. You absolutely don't want cleaning solution getting anywhere near your finished product. Now, find the 'Clean' button on the control panel. On most newer models, like the Indigo NXT series, you’ll need to press and hold it for a couple of seconds to get the cycle started.
The machine will kick things off by draining its water reservoir to purge the old water. Pay attention to the display—it’ll tell you exactly when to add the chemicals. When you see a prompt like "Add Chemical," it's go-time. Pour the Manitowoc-approved descaler directly into the water trough, following the mixing ratio on the bottle to the letter. Too weak, and it won't work; too strong, and you're just wasting money.
Now, just let it do its thing. The machine will circulate that descaling solution for about 20-30 minutes, dissolving all that crusty scale from the evaporator and other internal parts. Don't interrupt it.
Manual Scrubbing for a Deeper Clean
The automated cycle is a huge help, but it can’t get into every nook and cranny. Once the descaling cycle is done and the machine has rinsed itself, it’s time for you to step in. This is where you’ll deal with the stubborn gunk that automation always misses.
Double-check that the machine is still off at the breaker. Now, carefully start removing the internal components. Most are designed to come out without any tools.
- The Water Curtain: This plastic piece just lifts right off.
- The Distribution Tube: Usually unclips or slides out from the top. Check the tiny holes for clogs.
- The Water Trough: This reservoir often lifts straight out.
- Ice Thickness and Water Level Probes: These sensors are delicate. Be gentle when you wipe them down and don't bend anything.
Take these parts over to your three-compartment sink. Mix a small batch of descaler in a separate bucket and get to work with your soft-bristle brushes. Scrub every single surface, paying special attention to the corners where that pink or black slime loves to hide.
This manual step is arguably the most important. I've seen Los Angeles kitchens run the clean cycle religiously but skip the hand-scrubbing, only to wonder why they still have slime issues. The machine can't scrub corners—only you can.
After a thorough scrubbing, rinse every single part with fresh, clean water. You need to get all the descaler off before moving on. Any leftover acid will just neutralize the sanitizer you're about to use, making the next step completely useless.
The Final Sanitizing Process
With the scale gone and the parts sparkling, the last job is to kill off any bacteria, mold, or biofilm left behind. This is what ensures the ice you serve is perfectly safe for your customers.
Put all the components you just cleaned back into the machine. Make sure everything snaps or clicks securely into place. With the machine fully reassembled, you’re ready to run a second automated cycle—this time, with the sanitizer.
Hit the 'Clean' button one more time. The machine will drain and fill just like before. When it prompts you, add the Manitowoc-approved sanitizer, again following the mixing instructions exactly. The sanitizing cycle is usually a bit shorter than the descaling one.
Once it's finished, the machine will run a few final flush cycles to rinse out any leftover sanitizer. When the control panel gives you the all-clear, you can switch it back to 'Ice' mode and flip the breaker back on.
As a final pro-tip, always toss the first batch or two of ice after a deep clean. This just guarantees that any lingering chemical taste is completely flushed out of the system. To make this process foolproof for your entire team, consider using standard operating procedure templates to document the steps. That way, everyone from your head chef to a new hire can get it done right, every single time.
Building a Realistic Cleaning Schedule for Your Business
Once you’ve got the deep cleaning process down, the real trick is figuring out how often you actually need to do it. A generic schedule just doesn't cut it in a city as diverse as Los Angeles. The cleaning needs of a Thai Town spot will be completely different from a food truck in the Arts District, and your maintenance plan has to reflect that reality.
Creating a custom schedule isn't about guessing. It's about paying attention to your specific environment and understanding how it hits your equipment. This is the proactive approach that keeps your machine humming, prevents a surprise breakdown during a July heatwave, and makes sure you're always serving clean, safe ice.
Factors That Influence Your Cleaning Frequency
Plenty of local factors can speed up the buildup of scale and slime inside your Manitowoc machine. A restaurant in East L.A. might be fighting a constant battle with mineral scale from hard water, while a pizzeria next to a brewery in Torrance could face an endless supply of airborne yeast.
Keep these key variables in mind when you're setting your schedule:
- Water Quality: Los Angeles is famous for its hard water, which is loaded with minerals. This means faster limescale buildup, which acts like an insulator on the evaporator and forces your machine to work overtime, jacking up your energy bills.
- Airborne Contaminants: Kitchens are busy places. A nearby bakery, brewery, or even your own kitchen kicking up a lot of flour for Mexican, Japanese, or Chinese dishes can pump yeast and other particles into the air. All that stuff gets sucked into the ice machine and becomes food for slime and mold.
- Machine Usage: A high-volume bar in Hollywood slinging hundreds of pounds of ice every night is going to need more attention than a small café with less traffic. The more water cycling through the machine, the faster those minerals are going to build up.
Establishing Actionable Benchmarks
Instead of just picking a date on the calendar, build your schedule around what you actually see happening with your machine. Official recommendations are a great place to start, but what’s happening in your four walls should be the final word.
For instance, Manitowoc Ice suggests deep cleaning twice a year, but that can change. Restaurants with really hard water might need to descale more often. And businesses in environments with a lot of contaminants—like bakeries and breweries—often find themselves doing three to four major cleanings a year. You can learn more about how environmental factors influence cleaning needs on Easyice.com.
A simple maintenance log is one of the most powerful tools a kitchen manager can have. Just write down the date of each cleaning, who did it, and any notes about how the machine looked. After a while, you'll start to see patterns that tell you exactly when your machine needs some love.
This log becomes your personalized playbook. If you’re seeing heavy scale just three months after a full descaling, you now know a quarterly schedule is your new baseline.
A Sample LA Restaurant Cleaning Schedule
Here’s a practical, tiered schedule you can adapt for your Los Angeles restaurant, whether you're running a Korean BBQ joint or a seafood grill on the coast.
Daily & Weekly Tasks (5-10 Minutes)
- Wipe down the outside of the machine.
- Sanitize the ice scoop and its holder.
- Give the ice in the bin a quick visual check for clarity and quality.
Monthly Checks (15-20 Minutes)
- Pull out and clean the air filter. A clogged filter is one of the top reasons for overheating and component failure.
- Do a quick visual inspection of the water trough and distribution tube for any early signs of that pink or black slime.
Quarterly & Biannual Deep Cleans (1-2 Hours)
- Quarterly: If you're in a known hard water area or a high-yeast environment, plan on a full descaling and sanitizing cycle every three months.
- Biannually (Minimum): Every single restaurant, no matter the conditions, must perform a full deep clean at least twice a year. This is non-negotiable for meeting health standards and keeping your machine’s warranty valid.
This kind of structured approach doesn't just keep your ice machine in top shape; it also helps the entire cold storage ecosystem in your kitchen run smoothly. For more tips on maintaining your larger systems, check out our guide on best practices for a walk-in cooler and freezer combination.
Troubleshooting Common Problems and Protecting Guest Safety
Even with a flawless cleaning schedule, your Manitowoc ice maker might start acting up. Think of this as your first line of defense—a guide to connecting common symptoms back to cleaning-related issues before they turn into a full-blown emergency in your Los Angeles kitchen. Knowing what to look for can save you a frantic service call and keep your beverage service flowing.
Often, the ice itself is the first to tell you something's wrong. If you see a sudden change in its quality, that's a clear signal the machine needs immediate attention.
Decoding Your Ice Quality Issues
The shape, size, and clarity of your ice are direct indicators of your machine's health. When performance starts to dip, it’s almost always tied to a buildup of scale or slime that a proper cleaning can fix.
Keep an eye out for these red flags:
- Small or Hollow Cubes: This is a classic sign of a clogged distribution tube or a dirty evaporator. Mineral scale buildup stops water from flowing and freezing evenly, resulting in weak, undersized ice.
- Ice Forming in Sheets: If your cubes are coming out as one solid slab instead of individual pieces, the harvest cycle is likely being thrown off by scale on the ice thickness probe.
- Cloudy or Off-Tasting Ice: This usually points to a need for sanitization. Biofilm and other contaminants can dissolve into the water, affecting the taste and appearance of your ice.
For a deeper look into these issues, our comprehensive guide on commercial ice maker troubleshooting has more detailed solutions.
The Critical Link Between Cleaning and Guest Safety
Beyond just making good ice, consistent cleaning is a non-negotiable part of food safety. A dirty ice machine is a serious liability that can put the reputation of any Los Angeles restaurant on the line, from a trendy food truck to a fine dining spot.
The hidden danger is biofilm—a slimy, invisible layer of bacteria that thrives in the dark, damp environment inside an ice maker. This contamination can lead directly to foodborne illness, turning a simple glass of water into a major health risk for your customers.
A failed health inspection from a dirty ice machine isn't just a fine; it's a public record that can destroy customer trust. Protecting your patrons starts with what they can't see, and that means keeping your ice supply pristine.
When ice machines are cleaned infrequently, bacteria, mold, and slime can grow in the evaporator and water system, directly contaminating the ice. Environments with lots of yeast—common in Los Angeles breweries and bakeries—tend to see accelerated mold and slime growth.
Manitowoc's own documentation clearly states that descaling and sanitizing at least twice a year is the minimum to keep the food zone sanitized and protect customers. It's a foundational practice for any commercial kitchen.
Ultimately, knowing how to clean a Manitowoc ice maker is more than just maintenance. It’s an essential practice for safeguarding your business and honoring the trust your guests place in you every time they walk through your doors.
Your Manitowoken Cleaning Questions Answered
Even with a detailed guide in front of you, questions always come up, especially when you’re in the middle of a busy shift at your Los Angeles restaurant. Here are some of the most common questions we get from kitchen managers about cleaning a Manitowoc ice maker, with direct, no-nonsense answers.
Can I Use Vinegar to Clean My Manitowoc Ice Machine?
This is a hard no. While vinegar is a great all-purpose cleaner for many things around the kitchen, it's a machine-killer for commercial ice makers. The strong acid in vinegar will strip the sensitive nickel plating right off the evaporator.
This isn't just a cosmetic problem; the damage is permanent. Once that plating is gone, the evaporator can't transfer cold properly, which means poor ice production, higher energy bills, and eventually, a very expensive replacement. Always stick to the manufacturer-approved, nickel-safe descaling solution made specifically for your Manitowoc.
How Do I Know When It Is Time to Clean Besides the Schedule?
Your machine is actually great at telling you when it needs attention, often long before the calendar says it's time. You just have to know what to look for.
The ice and the machine itself are your best guides here.
- Look Inside: Open the front panel and take a peek inside the food zone. See any pinkish-orange or dark, slimy residue on the water trough or distribution tube? That’s biofilm, and it's a clear signal you need to sanitize immediately.
- Check the Ice: The ice itself will tell you a lot. If your cubes are cloudy, smaller than usual, or coming out as one solid sheet instead of individual cubes, it means scale is interfering with the freezing process.
- Listen to the Machine: Many newer Manitowoc models, like the Indigo series, have an indicator light that literally tells you when it's time. If you see that 'Clean' light flashing, don't ignore it.
A set schedule is a great baseline, but trust what you see. If you're running a busy K-Town bar or a restaurant with a lot of airborne yeast from baking, you'll probably need to clean more often based on these real-world signs.
What Is the Difference Between Descaling and Sanitizing?
Thinking these two jobs are the same is a common but critical mistake. Descaling and sanitizing are two completely different processes that have to be done in the right order to be effective.
Descaling comes first. This step uses an acidic cleaner to dissolve mineral buildup—the hard, crusty limescale that Southern California's hard water leaves behind. Think of it as breaking down the mineral armor that coats all the internal parts.
Sanitizing is the second step. This uses a different chemical solution to kill biological contaminants like bacteria, mold, and slime. The sanitizer can only get the job done once the descaler has stripped away that protective layer of scale.
You must always descale first, then sanitize. If you try to sanitize a machine full of scale, the chemical can't penetrate it to kill the microbes hiding underneath, making the whole process a waste of time.
Keeping your equipment in peak condition is essential for success in the competitive L.A. food scene. For all your commercial refrigeration and kitchen needs, from ice makers to commercial refrigerators and freezers, Los Angeles Restaurant Equipment has you covered. Explore our full catalog of professional-grade restaurant equipment at https://losangelesrestaurantequipment.com.