

How to Clean Your Ice Maker for LA Health Code Compliance
Knowing how to clean your ice maker goes way beyond a quick wipe-down. It’s a crucial process that involves descaling mineral buildup and sanitizing to kill off bacteria and slime. For any Los Angeles restaurant, that means sticking to a strict protocol with food-grade chemicals to keep health inspectors happy and your restaurant equipment in top shape.
Keeping Your Ice Maker Clean in a Competitive LA Market

In the high-stakes Los Angeles restaurant scene, ice is a core ingredient. It’s cooling down a spicy Thai curry, chilling cocktails at a downtown bar, and filling sodas at a busy Chinese takeout spot. The quality of your ice really matters.
Ice is officially classified as food by the FDA and the LA County Department of Public Health. That means your commercial ice machine is held to the same tough standards as your commercial refrigerators and freezers.
For any LA spot—from a Koreatown BBQ joint to a Mexican food truck in East LA—a neglected ice maker is a huge business risk. This isn't just about making clear, tasteless ice; it's about food safety, equipment life, and your restaurant's reputation.
The Real Risks of Neglect
Ignoring routine cleaning is just asking for problems that can shut you down during a dinner rush. The warm, dark, and damp inside of an ice machine is a perfect breeding ground for all sorts of nasty stuff.
Here are the common issues that pop up from poor maintenance:
- Slime and Biofilm: This is that pink or gray slimy gunk that can contaminate every single cube of ice it touches.
- Mold Growth: Black or green mold loves to hide in the corners and can become a serious health hazard.
- Scale Buildup: Southern California is famous for its hard water, which is loaded with minerals like calcium and magnesium. These minerals create scale—a rock-hard deposit that clogs water lines, damages parts, and tanks your ice production.
A failed health inspection because of a dirty ice machine isn't just a pain. It can lead to immediate closures, big fines, and a bad reputation that’s tough to shake in a city with so many dining choices.
Why Proactive Maintenance is Non-Negotiable
A "wait-and-see" approach to ice machine maintenance is a recipe for disaster. By the time customers complain about funny-tasting ice or a health inspector flags your machine, it's already too late.
For food truck operators, a failed inspection can sideline your entire business in an instant. It’s smart to get familiar with what inspectors look for by reviewing a detailed food truck health inspection checklist so you're always ready.
Preventative cleaning is just good business. It ensures you’re always serving a safe product, helps you dodge expensive emergency repair bills, and extends the life of your valuable restaurant equipment. On top of that, a clean machine runs more efficiently, using less energy and water, which helps your bottom line. It's a simple task that protects both your investment and your customers.
Gathering Your Essential Cleaning and Safety Gear
Before you touch a single part of that ice machine, you need to get your workspace staged with the right supplies. In a busy Los Angeles kitchen where every minute counts, having your cleaning kit ready to go can turn a dreaded, all-afternoon project into a quick, efficient task. This is about more than just convenience—it's about getting the job done safely, effectively, and keeping the LA County health inspector happy.
Proper prep stops you from reaching for a substitute cleaner that could seriously damage your machine or, even worse, contaminate your ice. Think of it just like setting up your mise en place before a dinner rush; it’s the key to a smooth, professional result every single time.
Descalers vs. Sanitizers: The Critical Difference
A lot of people think "cleaning" is just one step, but for a commercial ice maker, it's a mandatory two-part process. You absolutely have to use two completely different solutions to do this job right.
- Ice Machine Descaler: This is a special acidic cleaner made to dissolve mineral buildup, which you probably know as scale. With Southern California's notoriously hard water, this step is non-negotiable if you want to prevent clogs and keep your ice production humming.
- Ice Machine Sanitizer: This solution is what actually kills the nasty stuff—bacteria, mold, and slime. You always apply it after the descaler has stripped away all the physical grime, which ensures the surfaces get truly sanitary.
Using only one of these is a huge, yet common, mistake. Descaling without sanitizing just leaves a clean surface for bacteria to grow on. Sanitizing without descaling is even worse, as the solution can't get through the mineral deposits to kill the microbes hiding underneath.
Health Code Alert: Never, ever use unapproved household cleaners, especially bleach. It's a major violation that can corrode the nickel-plated evaporators and other sensitive parts in your machine. This leads to incredibly expensive repairs and an almost guaranteed failed health inspection. Always stick to nickel-safe, food-grade chemicals specifically designed for ice machines.
Assembling Your Complete Cleaning Kit
You’ll want a dedicated, clearly labeled kit just for your ice machine. This is crucial for preventing cross-contamination. Imagine using the same brush on your ice machine that was just used on the floor drain—it's a direct path to contaminating your entire ice supply.
Here’s a quick rundown of what you’ll need to put in your "Ice Machine Only" kit.
| Item | Purpose | Pro Tip |
|---|---|---|
| PPE | Safety goggles and chemical-resistant gloves protect your eyes and skin from cleaning solutions. | This is non-negotiable. Chemical splashes are a real risk, and your safety always comes first. |
| Descaler & Sanitizer | Manufacturer-approved, food-grade solutions for removing scale and killing bacteria. | Always check your machine's manual for recommended brands like Nu-Calgon or Scotsman Clear 1. |
| Soft-Bristle Brushes | For scrubbing components without scratching surfaces. A toothbrush is perfect for tight corners. | Stay away from abrasive pads or steel wool. They create tiny scratches where biofilm loves to grow. |
| Spray Bottles | One for your sanitizer solution and one with clean water for rinsing hard-to-reach areas. | Label them clearly to prevent any mix-ups. This helps with even application and a thorough rinse. |
| Buckets | You'll need at least two: one for mixing solutions and another for clean rinse water. | Designate these buckets for "Ice Machine Use Only" to keep them free of outside contaminants. |
| Clean Cloths | Lint-free microfiber cloths are best for wiping down components without leaving fibers behind. | Having plenty of clean cloths is also key to keeping those stainless steel surfaces spotless. For more on that, check out our guide on finding the best stainless steel cleaner for your equipment. |
Getting these items together in one spot makes a world of difference. When everything is organized, the whole process feels less like a chore and more like the professional maintenance it is.
The Complete Deep Cleaning and Sanitizing Process
Alright, you’ve got your supplies lined up. Now it's time to get into the real work: the deep clean. This isn't just a quick wipe-down; it's a full-on, methodical process to make sure every single part that touches water or ice is completely free of scale, slime, and bacteria. Before you even start, it's crucial to understand the difference between sanitizing and cleaning. They're two totally different but equally important stages of the job.
In a busy L.A. restaurant—whether you’re running a high-volume Thai kitchen in Hollywood or a bustling Japanese sushi bar downtown—a single bad batch of ice can kill a customer's experience. Follow these steps carefully. You'll be protecting your product, your customers, and your investment.
Initial Shutdown and Component Removal
First thing's first: safety. You absolutely have to disconnect the ice maker from its power source. For most machines, that’s as simple as unplugging it. If it's hardwired, you'll need to head to the circuit breaker and shut it off there. This is a non-negotiable step to prevent any chance of electrical shock or the machine suddenly kicking on.
Next, find the water supply line feeding the machine and turn it off. It’s usually a small valve on the wall nearby. Once the power and water are cut, you can start taking things apart.
- Empty the Bin: Get in there and scoop out every last cube of ice. You’re going to throw all of it away—never reuse it. It’s been sitting in the very environment you're about to clean.
- Remove Front Panels: Most commercial ice machines have front or top panels that pop right off, sometimes with just a few screws or clips. Getting these out of the way gives you access to the guts of the machine.
- Take Out Key Parts: Now, carefully remove the parts that are in direct contact with water. Your machine’s manual is your best friend here, but you're typically looking for the water curtain, the distribution tube (or trough), and the ice thickness sensor. Be gentle; these parts can be delicate.
The Manual Scrubbing Phase
With the main components out, it’s time for some old-fashioned elbow grease. This is where you physically remove all the gunk and scale buildup that the automated cycles just can't get. Think of it like cleaning tile grout—you have to scrub away the buildup before you can truly sanitize the surface.
This is a huge deal here in Los Angeles, where our hard water is a constant battle. That limescale can be incredibly stubborn, and it often creates a protective layer for nasty biofilm to hide under.
Go ahead and mix your descaling solution in a bucket, following the dilution instructions on the bottle. Drop the removable parts like the water curtain and distribution tube into the solution to soak. While they're soaking, grab a soft-bristle brush, dip it in the descaler, and start meticulously scrubbing the inside of the machine.
Focus your energy on the evaporator plate (that’s the grid where the ice actually forms) and the sump area. These are the prime spots where scale and slime love to hang out, directly messing with your ice quality.
Don't forget about the parts you left soaking. After a few minutes, give them a thorough scrub with your brushes, making sure to get into every little nook and cranny. Once everything's been scrubbed clean, rinse all the components and the machine's interior with fresh water to get every last trace of the descaler off.
To really tackle the deep cleaning of your ice maker, you will need the proper equipment. The infographic below highlights the essential gear for this process.
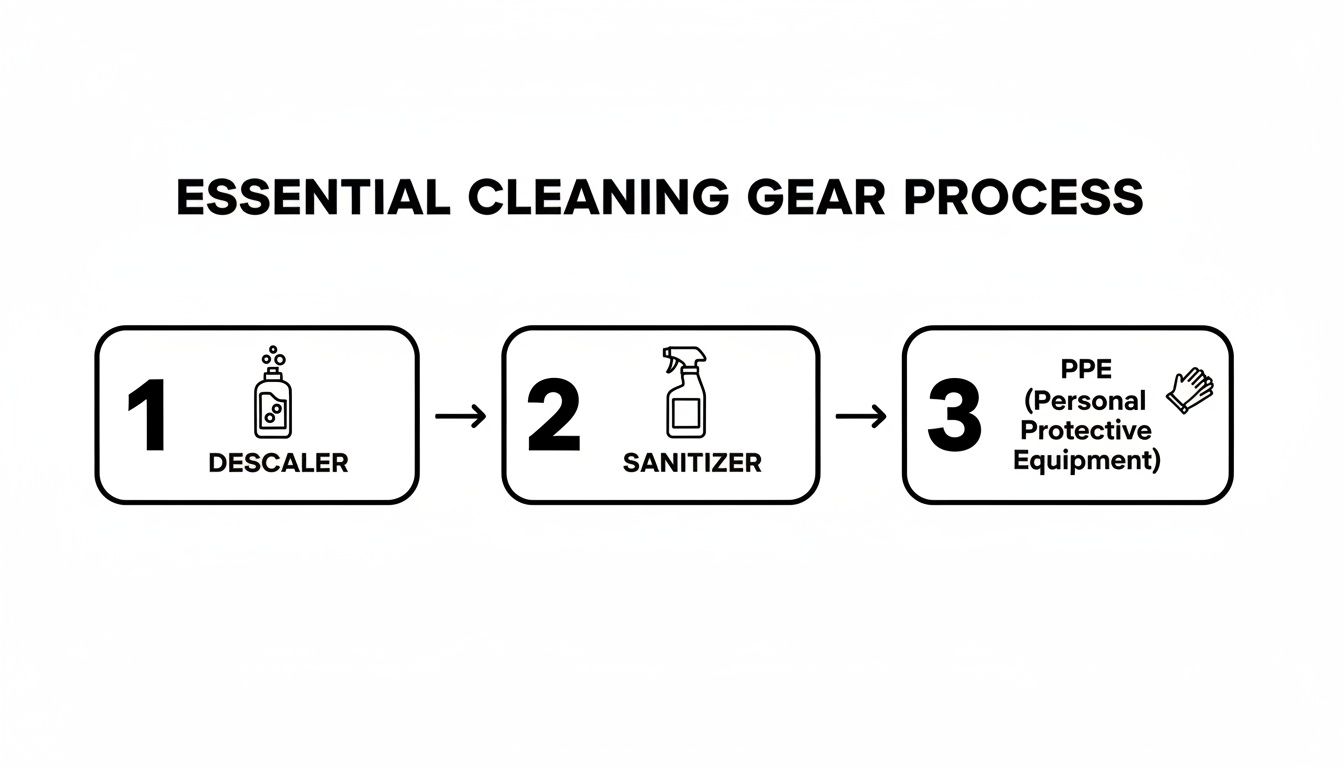
This visual guide shows the non-negotiable items for a safe and effective clean, from the chemical agents to personal safety gear.
Running the Automated Cleaning Cycle
You've done the heavy lifting. Now, let the machine take over for a bit. Most modern commercial ice makers, like the ones you see in busy Korean BBQ spots and high-turnover Mexican restaurants, have a built-in automated cleaning cycle. This cycle is a lifesaver, circulating the cleaning solution through the entire water system and hitting pipes and parts you could never reach by hand.
First, carefully put the internal components you removed—the water curtain, distribution tube, and sensor—back into the machine. Make sure you hear them click securely into place.
Next, find the "Clean" or "Wash" button on the control panel. The process is usually pretty simple:
- Pour the right amount of descaling solution directly into the water trough or sump. Check your manufacturer's guide for the exact measurement—too much or too little won't work properly.
- Press and hold the "Clean/Wash" button to kick off the cycle.
- The machine will then do its thing, circulating the descaler through its system for about 20-30 minutes.
During this cycle, the machine is basically giving itself an internal descaling treatment. When it's finished, the unit will automatically purge the cleaning solution down the drain.
The Final Sanitizing and Rinsing Steps
Cleaning removed all the soil and scale; sanitizing is what kills the germs. This is the step that keeps the health inspector happy and makes your ice truly food-safe. Just like with the descaler, you’re going to run another automated cycle, this time with sanitizer.
Mix your sanitizer solution according to the label's directions to get the correct parts-per-million (PPM) concentration. Pour the specified amount into the water trough.
Start the sanitizing cycle, which is often the same button as the clean cycle. The machine will circulate the sanitizer for another 10-15 minutes. This contact time is what actually allows the sanitizer to be effective.
After the cycle is done, the machine will drain the solution. While many sanitizers are "no-rinse," it’s always a good idea to run one final rinse cycle with clean water if your machine has that option.
Finally, grab a clean, lint-free cloth, dip it in your sanitizer solution, and wipe down the entire interior of the ice storage bin. Let it air dry completely before you let the machine start making ice again.
Pro Tip: Always, always throw away the first one or two batches of ice made after a full clean. This is your insurance policy to make sure any tiny chemical residues are completely flushed out before that ice ends up in a customer's drink.
Once the bin is dry, you can turn the power and water back on. Pop the exterior panels back in place, and your ice machine is officially back in service—running like a champ and making clean, safe ice that meets the high standards of the L.A. food scene.
Don't Forget the Coils, Bins, and Water Filters
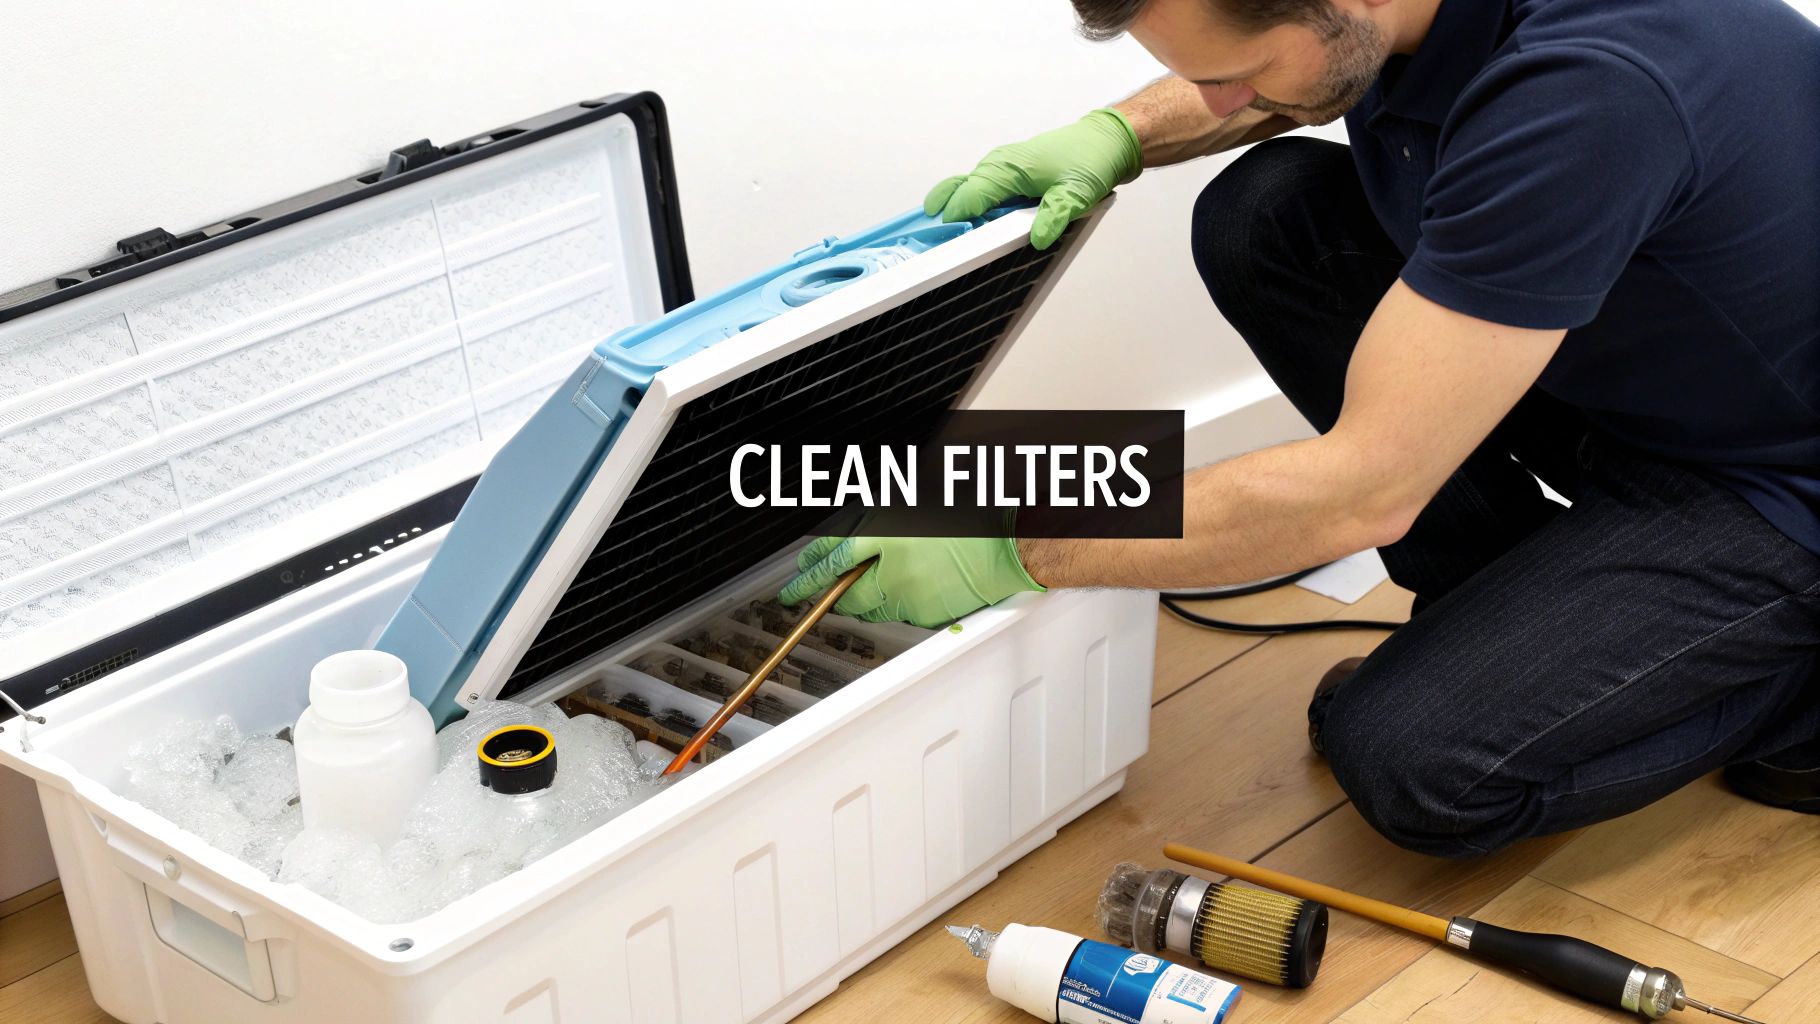
Running the machine’s internal cleaning cycle is a huge part of proper maintenance, but the job is far from over. A truly thorough cleaning means tackling several components that are just as critical for performance, safety, and efficiency.
These parts—the condenser coils, the ice storage bin, and the water filter—can single-handedly cause breakdowns or health code violations if you ignore them. For a busy Los Angeles restaurant, overlooking these areas is like mopping the floor but never taking out the trash. You're only doing half the job.
Tackle the Condenser Coils
Think of the condenser coils as the lungs of your ice machine's refrigeration system. Their job is to release heat, allowing the refrigerant to cool down and freeze water into ice. In a bustling L.A. kitchen, these coils are magnets for grease, dust, and flour particles floating in the air.
When this grime builds up, it acts like an insulator. The compressor is forced to work much harder to release heat, leading directly to higher energy bills. Even worse, it can cause the compressor—the most expensive piece of restaurant equipment in your machine—to fail prematurely.
Cleaning the coils is straightforward but absolutely essential:
- Power Down: Always unplug the unit or shut it off at the breaker first.
- Access the Coils: Remove the front or side panels to get to the coil fins.
- Brush Gently: Use a soft-bristle brush or a dedicated coil brush to wipe away dust. Always brush with the fins, not against them, to avoid bending the delicate metal.
- Vacuum Carefully: Follow up with a vacuum’s brush attachment to suck up all the loosened dirt.
For food trucks or kitchens in tight spaces where airflow is already a challenge, cleaning the coils every 3 months can prevent a catastrophic failure during a summer heatwave.
Keep the Ice Storage Bin Sanitary
The ice storage bin is a direct food-contact zone, and health inspectors in Los Angeles treat it exactly as such. Your machine could be spotless, but a dirty bin will contaminate every single cube that drops into it. That cool, damp environment is a perfect breeding ground for slime, mold, and bacteria.
Neglecting the ice bin is one of the fastest ways to get a health code violation. Biofilm, which often looks like a pinkish or gray slime, can develop in just a few weeks and poses a serious health risk to your customers.
Scrubbing the bin should be part of every deep cleaning routine. After emptying all the ice, use a food-grade detergent and a soft brush on every interior surface. Pay special attention to corners, seams, and the door gasket where grime loves to hide. After a thorough scrub and rinse, apply an EPA-approved, food-contact sanitizer and let it air dry completely.
The Critical Role of the Water Filter
If there's one piece of preventative maintenance that pays for itself ten times over, it's regularly changing the water filter. Here in Southern California, hard water is the constant enemy of any water-fed appliance, from commercial refrigerators to ice makers.
The water filter is your primary defense against the minerals, sediment, and chlorine that cause scale buildup and give your ice an off-taste. A clogged filter doesn't just fail to protect your machine; it also restricts water flow, drastically reducing your ice production. For a high-volume Chinese restaurant or a busy Japanese cocktail bar, slow ice production can bring service to a grinding halt.
Most manufacturers recommend replacing the filter cartridge every 3-6 months, depending on your local water quality and how much ice you make. This simple task takes less than five minutes and is one of the smartest investments you can make to protect your equipment and ensure every drink you serve tastes exactly as it should.
Creating a Foolproof Ice Machine Cleaning Schedule
So, you've survived the deep clean of your commercial ice machine. Great job. But now the real work starts: making sure this isn’t just a one-time thing. You need a simple, repeatable system. In the fast-paced Los Angeles restaurant scene, consistency is what separates the pros from the amateurs.
Waiting until you see slime or the machine breaks down isn't a strategy; it's a recipe for disaster. A simple, visible schedule keeps your team accountable, makes health inspectors happy, and saves you from those frantic, expensive emergency calls that always hit during the Saturday night rush.
This isn't about piling on more work. It’s about creating a smart routine that protects one of the most critical pieces of restaurant equipment in your entire kitchen.
Moving Beyond the Manufacturer's Baseline
Most ice machine manuals suggest a full deep clean and sanitization cycle twice a year. While that’s a decent starting point, for a high-volume spot in Southern California, it’s often nowhere near enough. Think about the unique grind of an L.A. establishment.
From a slammed Mexican restaurant in the Valley to a popular Thai joint in Silver Lake, the demand for ice is relentless. Manufacturers like Manitowoc and Hoshizaki set a baseline, but the reality on the ground is different. Any place dealing with hard water—and that’s most of Southern California—should really be looking at quarterly deep cleans.
A professional ice machine cleaning will typically run you $150-$300 per visit. Sticking to the bare minimum means $300-$600 a year. But bumping that up to a quarterly schedule, which can cost between $600-$1,200 annually, is a smart investment against much costlier repairs down the line.
For most LA-based operations, a quarterly deep clean is the professional standard. High-volume bars or restaurants in areas with exceptionally hard water might even benefit from a bimonthly schedule.
This proactive approach directly fights the rapid scale buildup from our local water and stops biofilm from getting a foothold. It’s money well spent to avoid downtime and service calls.
Structuring Your Cleaning Cadence
A schedule that actually works breaks tasks down into manageable daily, monthly, and quarterly duties. This way, you catch small issues before they snowball into major headaches.
Here’s a practical framework you can tweak for your own kitchen:
-
Daily Tasks (Under 5 minutes):
- Wipe down the machine's exterior, especially the door handle and scoop.
- Make sure the ice scoop is in its clean, designated holder—never left in the ice.
- Give the ice a quick visual check for clarity and any weird smells.
-
Monthly Tasks (15-20 minutes):
- Pop open the bin and do a quick interior check for any signs of slime or mold.
- Change out the external water filter cartridge. Do it more often if your water quality is poor.
- Check the air filter and condenser coils. If you see dust building up, give them a quick brush and vacuum.
-
Quarterly Tasks (1-2 hours):
- This is the big one. Do the full deep cleaning and sanitizing process we walked through earlier.
- Thoroughly scrub and sanitize the entire ice storage bin.
- Inspect all water lines and connections for any leaks or kinks.
The Power of a Cleaning Log
The final piece of the puzzle is a simple cleaning log. Just a chart, posted right by the ice machine, that tracks every cleaning task. It should have columns for the date, what was done, and the initials of the crew member who did it.
This log accomplishes two critical things. First, it creates accountability and makes cleaning a visible, non-negotiable part of the kitchen routine. Second, when an LA County health inspector walks in, it’s your immediate, undeniable proof that you take food safety seriously.
To really lock in your system and get everyone on the same page, using a standard operating procedure template can standardize the process for every team member. A well-documented routine is your best defense against both equipment failure and compliance issues.
Common Ice Machine Questions from LA Restaurateurs
Even when you're on top of your cleaning schedule, questions and weird issues are bound to come up. In a fast-paced L.A. restaurant, you don't have time for guesswork—you need real answers to keep your ice maker humming and the health inspector happy. Let's dig into some of the most common questions we hear from local operators.
How Often Should I Really Be Cleaning My Machine?
The manufacturer’s manual might suggest cleaning twice a year, but that’s just not going to cut it in a busy Los Angeles kitchen. Our notoriously hard water means scale builds up fast, and constant use is a recipe for slime.
For most restaurants, a complete descaling and sanitizing cycle is non-negotiable every three months. If you’re running a high-volume bar or a food truck with less-than-perfect ventilation, you should probably bump that up to every other month.
A quick monthly check-up can be a real game-changer, though. We’ve seen places cut their unplanned downtime by a staggering 75% just by adding a 15-minute monthly inspection. All it takes is a quick wipe-down of the bin and a peek inside for any early signs of scale. This is one of the easiest ways to protect your investment.
Why Does My Ice Taste or Smell Bad?
This is a classic sign of a dirty machine. Nine times out of ten, the culprit is a water filter that’s long past its prime. Once it's clogged, it can't do its job of pulling chlorine and other stuff out of the city water, which leads directly to funky-tasting ice.
The other possibility is biofilm or mold lurking somewhere in the system. You might not even see it, but a small amount can easily taint an entire batch of ice. A full deep clean, followed by a new water filter, almost always solves the problem for good.
Pro Tip: Don't forget about the ice bin itself. Simply leaving the door open or using a dirty scoop can introduce airborne nasties from your kitchen. Think yeast from a nearby bakery or grease particles from the fryer line—ice will absorb those smells and tastes in a heartbeat.
What’s That Pink or Black Stuff in My Machine?
That’s the stuff of a health inspector’s nightmares. The pinkish slime is biofilm, and the black spots are mold. Both love the dark, damp environment inside an ice machine.
If you see either one, you need to act immediately: stop using the machine, throw out all the ice, and get to work on a serious deep clean and sanitization. These things won't just go away; they’ll multiply. Regular cleaning is the only defense.
For more detailed steps on what to do when things go wrong, our guide on commercial ice maker troubleshooting is a great resource.
At Los Angeles Restaurant Equipment, we provide the high-quality, reliable Atosa ice makers that are essential for any successful LA eatery. Keep your service running smoothly with equipment you can count on. https://losangelesrestaurantequipment.com